
written by Adam
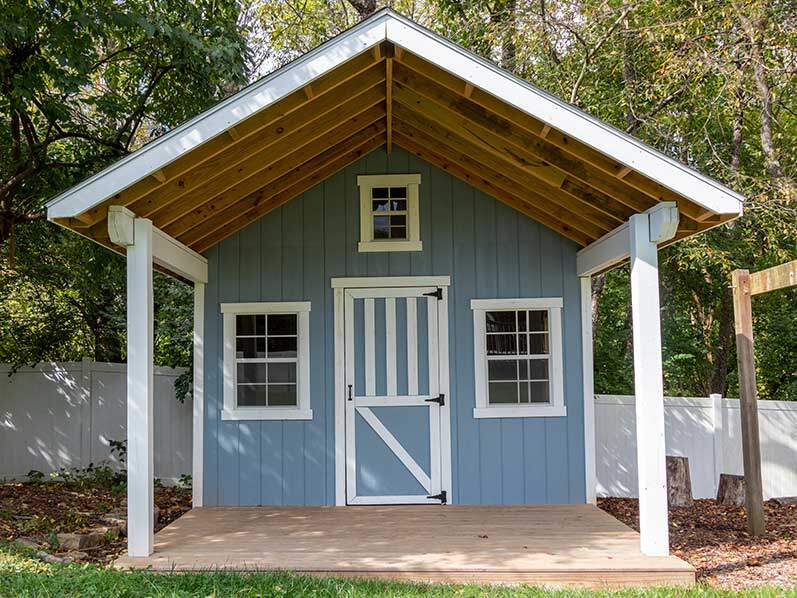
When we moved in 2019, we gained a basement but lost a storage shed. Unfortunately, the garage was not roomy enough for our outdoor tools and equipment. Despite the long list of home improvement projects awaiting us, a new shed quickly became a top priority. I researched the options and ultimately decided to build the shed myself.
Table of Contents[Hide][Show]
Some of the links in this post are affiliate links. Learn more in my disclosure policy.
Building Options for Backyard Sheds
There are many ways to add a storage shed to your backyard. Cost, required labor, and DIY experience are major factors in choosing which option is best for you.
Option 1: Pre-Built Sheds
You can buy a shed from a big box store or a local shed manufacturer complete with delivery and installation. Keep in mind that you may still need to do some manual labor like preparing the site or painting the shed.
Option 2: Pre-Made Shed Kits
If you are more adventurous and have basic construction skills, you can order a pre-made kit. These kits include all the materials and assembly instructions. They are typically made from vinyl or other lightweight materials, but wood kits are also available. You are responsible for preparing the site and then assembling the shed.
Option 3: Building Plans for Storage Sheds
As a third option, you can purchase a construction plan and build the shed from raw material. This requires buying all necessary materials and cutting them to size.
Option 4: Do Everything Yourself
Technically a fourth option is available. You could design the shed yourself. If you are a beginner like me, this probably isn’t a great idea.
Accepting the Challenge of Building a DIY Shed
Initially, our best option seemed to be buying a shed kit and paying someone to build it. Yet, I had a desire to involve my oldest son (then 10-years old) in this process. The house came with a run-down playset, and I was convinced that I could convert one side of the structure into a small shed. However, my wife thought this was a terrible idea due to its size, condition, and location. She took to Pinterest to persuade me otherwise.
As with most ideas from Pinterest, my wife’s ideal shed had to look nice in addition to just holding shovels and bikes. Eventually, she discovered Paul’s Sheds after first finding Paul’s Playhouses. These companion websites offer plans for a variety of sheds and playsets.
When she showed me the pictures of the sheds, I was intrigued, but the project seemed far too ambitious. Before long, I began to warm up to the challenge. Besides, it would offer a chance to involve my family in the project. It could be fun or a massive failure. At the very least, I would get some new tools out of it.
DIY Plans from Paul’s Sheds
We bought the Brayton Shed Plan from Paul’s Sheds in May of 2020. My goal was to complete the shed by Halloween. That should be more than enough time, right?
After printing out the plans, I read through them entirely. Then I read through them again. I followed that with pep talks that I could really do this and read through the plans a few more times. I was quickly able to identify what areas of the project would be the most challenging and began devising a plan of attack for them.
Read More: DIY Shed Plans from Paul’s Sheds
Building Materials and Expenses
The first step in buying the materials was to know what I needed and when I would need it. As I planned to work on this project over several months, I decided to order the bulk of the materials in three phases: the decking, the framing, and the roof. Splitting the purchase of materials into phases meant that we never had to store too much at one time.
First, I ordered materials to build the deck. This included the joists, deck boards, plywood decking and deck blocks. I shopped around at the big box stores and selected the one that had all the materials in stock and could deliver in a reasonable time frame. This June 2020 purchase came to just under $1000.
Once the deck was complete, I then ordered the materials to build the framing. This was the biggest order, resulting in a large amount of lumber stored in our backyard. I chose to use pressure-treated wood as it would be exposed to rain during the build. This mid-July order was $1750.
Next, I ordered the roofing material in September. Due to a billing issue, the delivery fee was waved. The order total came to $740.
The last major order was for the windows. This late September order was $420 for five shed windows from Treehouse Supplies. By ordering these windows at the time of need, we saved ourselves money. Midway through the build we chose to reduce the number of windows from eight to five since the back wall of the shed was near a fence and didn’t need windows.

Our budget shows additional expenses from the several trips to Lowe’s and a couple Amazon orders. I also purchased a jigsaw and table saw for this and future DIY projects. We paid for everything out of our remodeling savings.
Read More: Living Debt-Free in a Fixer-Upper
Building the Shed
Preparing the Foundation
The first challenge was preparing the site and choosing the method for setting the shed floor. I considered using concrete footers but ultimately wanted a simpler, less permanent option. Although concrete footers would provide the most stability, using concrete deck blocks provided more flexibility during the build.
Deck blocks are designed to hold 2×6 joists that make up the shed floor. Because the build site sloped, I had to work hard to remove dirt and level the ground. Even with that effort, I still needed to adjust the height of certain blocks to set the joists level. We had some cement blocks that were left on our property that provided a good base to do this. For each deck block, I dug down several inches and filled the area with pea gravel to provide a stable base.
The joists were heavy and awkward to maneuver by myself. Placing them and adjusting for level was a hassle. Clearly, asking others to help would have saved time and strain on my back. Building the shed gave me several other opportunities to learn that lesson, but I wanted it to really sink in first.
Completing the Deck
Once the joists were set and level, fastening them together was straightforward. I followed this by fastening the deck boards and the plywood decking. For the decking I used 2-inch deck screws. At this point we had an 8’x12’ deck that the kids enjoyed running around on. While the next phases seemed more daunting, I was now committed and ready to move forward.
Framing the Walls
Cutting the lumber and constructing the walls was straightforward, and the plans were generally easy to follow. After figuring out the measurement conventions, I was able to move quickly to dry fit the walls and then fasten them. I opted to follow the recommendation from Paul’s Sheds to use exterior structural screws from GRK. They provided a strong grip and are designed to hold up well to the elements.
At this point I had to admit my need for assistance and asked my wife to help me raise the walls. We successfully lifted the first three into place. Then we attempted to raise the fourth several times. To my wife’s relief, I finally asked our neighbor for help. Just like that, the four walls were up. Two months in, and it was starting to look like a building.
Adding the Siding
The plans from Paul’s Sheds provide instructions for installing basic plywood sheeting for siding with guidance on other options. After some online research, I chose a primed panel siding intended for sheds. With a little wrangling, I was able to place and nail the 4×8-foot sheets onto the framing.
Building in Support Beams
From this point, most of the work had to be done at eight feet or higher. The design plans required two 8×8-inch posts to support the roof at the front of the shed. I modified the plans to accommodate the deck blocks and still provide a place for the posts to attach to the deck.
Next, I built and added two large beams to carry the weight of the roof across the front half of the shed. Of course, I attempted to lift them in place myself – probably to the entertainment and slight concern of my neighbors. Eventually, I asked my wife for help, and we hoisted the beams in place. She would have preferred that I had asked a neighbor.
Raising the Rafters
Next came the most interesting instructions in the plan. I was to assemble all of the roof rafters and then “lift the assembly and fasten to the top plates”. Keep in mind this assembly structure would have consisted of over twenty rafters, each made of 8-foot long 2×6 lumber, plus a 16-foot long 2×6 rafter. I didn’t bother to do the math, but I knew this would be far too heavy for me to lift even on my best days or with the help of my entire neighborhood. Thus, I had to devise another plan.
After thoroughly reviewing the plans, I decided to construct the truss at the back of the shed. This required additional lumber to provide a stable place to attach the 16-foot header. With the help of my wife, we lifted the header in place. She held it steady while I fastened two rafters at the opposite end to secure it. Now I could attach the remaining rafters individually.
Each rafter needed to be notched on both ends. I felt that the plans were lacking here as only a minimal set of measurements was provided. I was forced to break out some high school geometry skills to figure out the missing measurements. After confirming that the first rafter would fit correctly, I made a template to use on the remaining rafters. This gave me the excuse to purchase a jigsaw since my other saws were not appropriate for the task. The process of cutting, lifting, and attaching each of the rafters was a tiring process. Eventually, all were in place and the shed was beginning to take shape.
Roofing the Shed
The final phase of building was completing the roof. The plans provided some basic guidance on how much roofing material to add, but the details of installing the roof were left to the reader. Since I had some experience roofing, this task seemed less daunting. However, it was no less strenuous.
Once again, I decided that I could tackle this part of the project on my own. I systematically wrangled multiple full sheets of plywood onto the roof. At this point, I discovered an issue with my method of attaching the rafters. Because some rafters were not completely square, the plywood sheet did not align with one of the rafters. Thus, I had to add a piece of a 2×6 to the rafter to provide a fastening surface. This extra piece now stands as a monument to my DIY abilities.
Once the sheeting was installed, I spent the next two weekends adding the shingles. Unfortunately, the pitch was too steep to safely walk around. To overcome this issue, I purchased these roof brackets that provided a place to safely position myself on the roof.
Completing the roof was a huge accomplishment. The shed was now waterproof, and the brunt of the labor was behind me.
Window Light
Next, I cut the openings for the shed windows and installed them. This task exposed other errors I had made in the framing, like window openings that were not completely square. Although it was harder to nail the windows in place, they did all fit. Thankfully, the window trim concealed the most obvious mistakes.
Building the Shed Door
Next, I built the shed door. Again, the plans provided basic measurements but not the details of the angles needed for the cross patterns on the door. To make this easier, I simplified the design. Since specific hinges and door hardware were not specified in the shed plans, I chose what I liked at the local home improvement store.
Conveniently, my father was visiting for the weekend and agreed to help me hang the door. It was easy to install unless you count the three times we trimmed the bottom to allow it to swing freely.
Painting the Shed
As we approached the finish line, we selected a paint color and had a family painting day. The youngest kids lasted about thirty minutes until we sent them to watch TV. My wife was relieved to see them go. We were able to add two coats of paint over the course of a day. The next weekend I painted and installed the remaining trim.
And just like that, we were done – two weeks ahead of my October 31st deadline. It was a long and arduous process but also one of the greatest senses of accomplishment I had felt in a while.
Life Lessons from Building a Shed
While I learned many construction techniques that will help as we continue to remodel our new home, I also learned more valuable life lessons.
Don’t be afraid of hard things – It took time for me to accept the challenge, but once I got started, I had no choice but to continue. This forced me to overcome excuses and just keep moving forward.
Follow a proven plan – Having a set of plans for the shed, I could focus on the next step and not get overwhelmed by the scope of the project.
Get help from others – Although I took pride in completing most of the project on my own, my resistance to asking for help could have resulted in injury. If nothing else, it definitely slowed me down. I will be more likely (I hope) to seek help when doing hard things.
Listen to your spouse – Without my wife’s prodding, I never would have attempted such a feat. I’m grateful for her confidence in me and her patience throughout the project.
Conclusion
Building a shed from the ground up is daunting, demanding, and yet remarkably rewarding. What DIY project have you thought about taking on? How might this project enrich your life both in the outcome and the experience?
Read More: DIY Shed Plans from Paul’s Sheds